CPU
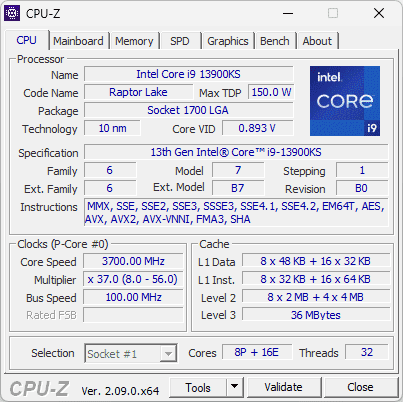
Processor name, code name, package, core/thread count, cache sizes, and instruction sets. Useful to confirm you received the CPU you paid for and to see stepping/revision when two retail boxes look identical.
CPU-Z is free Windows software from CPUID that pulls model names, memory timings, and CPU details from the machine. Here we walk through the tabs, spell out what the numbers usually mean, cover typical forum-style problems, and link to direct Windows and Android downloads below.
This site is not affiliated with the original developer. Windows and Android builds are linked below as direct downloads.
Upgrading RAM, chasing a crash, or selling a PC usually starts with one question: what is actually installed? CPU-Z reads identifiers from the hardware—module part numbers, BIOS version, CPU stepping—so you are not guessing from worn stickers or vague retail names.
It shows up constantly for RAM shopping (SPD tells you what is in each slot), board and BIOS checks before a flash, and CPU verification when two boxes say the same model but silicon can differ. Support threads and shops often ask for screenshots because one window covers the basics.
Each tab pulls from a different part of the system. Knowing which is which saves confusion in help posts—for example, box-speed marketing versus the clock the CPU is holding at that second.
Processor name, code name, package, core/thread count, cache sizes, and instruction sets. Useful to confirm you received the CPU you paid for and to see stepping/revision when two retail boxes look identical.
Manufacturer, model, chipset, BIOS version/date. Critical before flashing BIOS or when a driver site lists ten boards with similar names.
DRAM type (DDR4/DDR5), total size, current frequency and timings as reported by the memory controller. Helpful to verify XMP/EXPO is actually applied.
Serial presence detect: per-slot module manufacturer, part number, nominal speed tables, and XMP/AMP profiles. If dual-channel is wrong, SPD is where you notice a stick missing or seated badly.
GPU name, process, clocks, memory type/size where available. Handy on laptops with hybrid graphics to see which device is primary in software.
A simple built-in benchmark on supported versions. Treat it as a coarse health check, not a substitute for dedicated stress tests. Compare results only on similar power profiles and drivers.
There is an ARM64 build for Windows; coverage for new SoCs lands in release notes. On an ARM laptop, grab the ARM build from CPUID rather than assuming the usual 64-bit PC installer is the right one.
A screenshot helps only if the right fields are visible. Use the points below when you post for help or check a machine you might buy.
Modern CPUs scale frequency every millisecond. A single snapshot in CPU-Z may show a low idle clock even though the chip boosts under load. For stability testing, pair identification in CPU-Z with a sustained load tool and a temperature monitor such as Core Temp or HWMonitor.
DDR memory is often discussed in “MT/s” while some labels show half that value as a frequency. When upgrading, match DDR generation, module type (UDIMM/SODIMM), and ideally speed bins. SPD shows what the modules are rated for; the Memory tab shows what the system is running right now.
The board model in software is what the firmware advertises. If it looks unfamiliar, search the exact string plus “BIOS” to land on the right support page. Keep a note of the BIOS date before you update—if something goes wrong, support will ask for it.
Sites like valid.x86.fr let you publish a CPU-Z validation ID so others can inspect the same structured data without re-uploading images. That reduces arguments about “Photoshopped tabs” in sales threads.
A validation link is a snapshot others can open: CPU, board, memory, sometimes bench scores. For a used kit or expensive RAM, a recent validation plus matching SPD part numbers in your own photos is stronger than a single cropped tab.
Validators such as valid.x86.fr are third-party sites; use them as references, not guarantees.
These are common reasons people open the app; your setup may differ.
Open the SPD tab and write down module part numbers, ranks, and XMP profiles. Check whether both channels populate. Then search for your motherboard’s qualified vendor list (QVL). CPU-Z does not replace QVL research, but it stops you from guessing whether you currently run 1×16 GB or 2×8 GB.
Take CPU-Z screenshots of CPU, Mainboard, Memory, and SPD. Better: add a validation link. Pair with a short video showing the machine booting if the sale is remote—scammers rarely match every string across tabs.
Capture CPU-Z before and after clearing CMOS. If Memory tab timings change dramatically, your instability may be memory training rather than CPU voltage. Document BIOS version from the Mainboard tab when asking for help—answers depend on AGESA or Intel ME context.
The Graphics tab lists the active adapter strings. On hybrid systems, power modes can switch GPUs; note whether you were on battery and which driver branch is installed. For persistent doubts, cross-check with the device vendor’s spec sheet.
Extra cases that come up often—handy as a checklist when you are on the phone with a friend or filing a ticket.
Retailers sometimes want evidence that the installed processor matches the box. Capture the CPU tab with stepping, revision, and cache blocks visible. Add a photo of the retail label and keep BIOS defaults—odd overclocks can invalidate warranty conversations even when the hardware is fine.
Before you remove modules, export your mental model: SPD part numbers per slot, ranks, and nominal speed tables. When the replacement kit arrives, re-run CPU-Z and confirm the SPD strings changed—not just the Memory tab frequency, which can look similar across kits.
Marketing speeds are ceiling claims under specific BIOS versions and CPU memory controllers. CPU-Z reflects what the firmware applied after training. If EXPO/XMP failed silently, you may be on JEDEC defaults. Document Mainboard BIOS date before tuning—older AGESA or Intel microcode can cap memory training.
Note OS power mode, whether the laptop is on AC, and whether an external monitor is routed through iGPU or dGPU. Take two screenshots minutes apart if the system switches adapters dynamically. Pair with the vendor’s MUX switch documentation if applicable.
Compare CPU name, core count, and cache sizes against your receipt. If the OS was cloned from another image, also check Mainboard strings—unexpected board names can indicate a mainboard swap rather than a CPU swap.
Firmware fast boot and OS-specific drivers can change how aggressively the CPU idles. For apples-to-apples comparisons, boot Windows, set a known power plan, wait two minutes, then capture CPU-Z under a light repeatable load (not a random single screenshot at desktop).
Standardize a portable ZIP workflow, capture CPU + Mainboard + Memory in one pass, and store files by asset tag. IT teams value consistent filenames more than pretty screenshots—use ASSET123_cpu_main_mem.png style naming.
Driver branches sometimes rename reporting strings even when silicon is unchanged. Capture CPU-Z before and after the update alongside the driver version from the vendor installer. That prevents false panic when only the label moved.
CPU-Z alone will not show sustained power limits; pair it with a temperature tool. Still, CPU-Z helps document base configuration before you re-paste or adjust fan curves—especially when the seller claims “like new.”
Charities often publish “minimum specs” lists. CPU-Z gives defensible evidence of CPU generation and RAM size after you wipe storage. Avoid sharing serial numbers publicly—crop screenshots if you post them online.
Copy or adapt these so whoever is helping you gets the same facts in one pass.
Short meanings for labels you will see in the app. Exact names vary by board and CPU.
Quick reality checks before you RMA something or fight in a thread.
| Common claim | Why it breaks down | What to do instead |
|---|---|---|
| “If CPU-Z says DDR5-4800, my kit is defective.” | You might be on JEDEC defaults, training failed, or the CPU memory controller limits the ceiling. | Compare SPD profiles vs Memory tab, update BIOS, re-seat modules, then re-test. |
| “Lower GHz in CPU-Z means my PC is slow.” | Idle snapshots mislead; laptops aggressively downclock on battery. | Capture under a known load with a defined power plan and AC power. |
| “GPU name mismatch = fake laptop.” | Driver rebrands, hybrid switching, and external display paths change active strings. | Document power source, display routing, and driver version alongside screenshots. |
| “SPD empty = dead RAM for sure.” | Seating, firmware blocks, and bus contention also produce blanks. | Swap slots, single-stick tests, close other hardware tools, update chipset drivers. |
| “Bench score defines my entire PC worth.” | Cooling, background tasks, and power limits swing short benchmarks. | Use Bench as a coarse signal; validate stability with dedicated stress tools. |
| “VM CPU-Z equals bare metal proof.” | Guests can show synthetic models and partial cache layouts. | Run on host OS for sales, warranty, and hardware dispute evidence. |
Problems that show up when “total GB” was the only thing anyone checked.
Symmetric configurations help dual-channel modes and sometimes training stability. If SPD shows mismatched ranks or different XMP blobs, expect the motherboard to pick a safe common denominator. CPU-Z makes those mismatches visible before you spend money.
Some machines ship with soldered RAM plus one slot. CPU-Z cannot unsolder chips—but it prevents ordering a second SODIMM when none exists. Check SPD population maps against the physical bay count you expect.
Firmware can fail training and reboot into safe defaults without a loud error. Compare SPD profile targets with the live Memory tab. If they diverge, your next step is BIOS logs and gradual manual tuning—not another purchase.
CPU-Z helps you document the old world before you migrate boards. Save screenshots of the old SPD kit in case you need to re-buy similar latency characteristics for a sensitive workload.
CPU-Z inside a guest can still orient you, but do not treat it like proof of physical hardware for a sale or warranty.
Guests may show a synthetic model string while still exposing some cache sizes. Treat this as “environment labeling,” not silicon forensic proof.
Developers often compare Windows-native and Linux-native readings. Note kernel and hypervisor features enabled in firmware—CPU-Z captures the Windows side story.
If you rent a remote PC, assume everything is a managed image. CPU-Z helps you learn what you paid for this month, not what metal sits in a specific rack row.
Usually it is an old build, another tool locking the SPD bus, Windows permissions—or the number is fine and the reading was taken at idle.
| Symptom | Likely cause | What to try |
|---|---|---|
| SPD tab empty for a slot | Stick not detected, bad seat, or firmware block | Reseat RAM, test one stick, update chipset drivers, try the latest CPU-Z from the official developer. |
| CPU name looks generic or wrong | Very new stepping, ES/QS sample, or hypervisor masking | Update to the newest build; check for virtualization layers; compare with OS device manager. |
| Clocks frozen low on laptop | Power saver, thermal limit, or plugged state | Use balanced/high performance plan, AC power, and log under load—not at idle. |
| Antivirus quarantined CPU-Z | Heuristic false positive on low-level reads | Restore from the official ZIP; report through vendor channels; verify hash when possible. |
| Program will not start after OS update | Blocked by policy, corrupted download, or missing runtime dependency | Re-download using a fresh direct link (see below), unblock the ZIP, run as a normal user first, then review Event Viewer if it still fails. |
| SPD flickers between populated and empty | Another utility is polling the same SMBus lane | Close RGB suites, motherboard tuning tools, and laptop OEM “system care” apps; retry on a clean boot if needed. |
| Graphics tab missing on Server SKU | Headless roles, remote session-only GPUs, or minimal display stacks | Attach a local session with a real display path or compare with vendor management tools for out-of-band inventory. |
| CPU name differs from retail box | Regional naming, engineering sample, or reseller sticker errors | Compare stepping, core count, cache sizes, and socket package; escalate with photos if fraud is suspected. |
| Bench tab crashes instantly | Unstable overclock, aggressive undervolt, or broken power profile | Return to BIOS defaults temporarily, update chipset/GPU drivers, and test after thermals are healthy. |
| All tabs look “too old” after clone | Image deployed from different hardware without cleanup | Run on fresh boot, reinstall chipset drivers from the board vendor, and avoid comparing cloned images to new installs. |
| Android reading differs from desktop for same device | Different APIs, thermal states, and OS build channels | Treat both as hints; use desktop CPU-Z when planning Windows-side upgrades and Android readings for quick identification. |
For product defects or crash dumps, the developer maintains bug report and contact pages.
Download only from the official developer website or mirrors clearly linked from the official site. Avoid bundled installers from unrelated download portals. On Windows, prefer the ZIP/portable package if you want fewer surprises.
CPUs change speed constantly. Task Manager may average or round differently. Capture CPU-Z while running a known load if you need comparable numbers, and note power limits in BIOS.
Normal identification reads are light. The Bench tab runs a short workload when you start it. It is not a replacement for long validation tools like Prime95, OCCT, or memory testers such as MemTest86.
Yes—the developer publishes a dedicated Android page. Mobile SoCs expose different data paths; treat phone results as complementary to PC screenshots when comparing devices.
Refer to the developer’s own legal pages for authoritative wording: privacy policy and terms of service.
Usually the module is not fully detected, the slot is disabled, or another program is locking the SPD bus. Reseat RAM, test one stick, update chipset drivers, close RGB and tuning utilities, then try the latest build from the official developer.
No. It tells you what is installed and what SPD says; whether a new kit will train and post still depends on the board, BIOS version, and the vendor’s QVL. Use CPU-Z to collect part numbers and speeds, then check the list.
It proves what hardware the firmware reports right now. It does not prove shipping history, prior use, or whether parts were swapped yesterday. Combine screenshots with receipts, seals, and—when serious money is involved—professional inspection.
Normal identification reads are light. Leaving extra monitoring tools running is a different story. Close what you do not need before benchmarking or competitive play.
BIOS defaults, AGESA or microcode versions, and training luck all matter. Even small differences in firmware age can pick different safe tables after memory training.
It is not a BIOS editor. Changing frequencies or enabling XMP/EXPO still happens in firmware setup. CPU-Z reports the outcome after the system trains and boots.
No. Pair identification with a temperature and power tool. CPU-Z helps you document the hardware baseline; it does not replace sensor graphs under load.
Follow internal policy first. Some organizations allow signed packages in a sandbox; others provide corporate inventory agents instead. Do not bypass security controls—ask IT for an approved workflow.
Treat them as hints. Prefer live video, validation links, and consistent tab details across CPU, board, memory, and SPD. Mismatched dates or cropped critical fields should prompt more questions.
Battery saver, silent fan modes, VBS-related overhead, and corporate power policies can cap boost behavior. Mention AC vs battery and the active power plan when asking for help.
Consumer boards and firmware vary in how they expose ECC status. CPU-Z can still show module identity via SPD in many cases, but mission-critical verification should follow vendor documentation for your platform.
Use the ARM64 build when applicable. If a tab is sparse, it may be a platform limitation or an immature firmware path—not necessarily user error. Read release notes from the official developer when a new SoC launches.
Try a normal launch first. If SPD or certain reads fail consistently under a locked-down profile, elevation can change outcomes—but only when your policy allows it.
After major platform launches, BIOS updates, or when tabs suddenly look wrong compared to reviews. You do not need daily updates unless you are chasing new CPU support.
It helps compare reported strings to expectations, but determined fraud can still involve deep software tricks. Cross-check device manager, driver INF details, and physical inspection when a deal is too good.
It is a snapshot hosted by a third-party service. Links can break, services can change, and hardware can be upgraded later. Download a local screenshot archive for your own records.
CPU-Z is narrow on purpose. For sensors, long reports, or drivers, use something built for that.
Voltages, temperatures, fan speeds—pairs naturally with CPU-Z snapshots.
Remote monitoring features for IT-style workflows.
Broader inventory-style reports for auditors who want everything in one export.
Hardware detection with a driver/update angle—useful after board swaps.

The developer offers professional kits for OEMs and tool builders—see the developer pro portal for system information and monitoring products.
For integrators embedding sensor logic—distinct from the free consumer app.
Short reminders; the longer explanations are in the sections above.
Direct links for Windows (including ARM64 builds where applicable) and Android. Prefer ZIP/portable if you want fewer installer prompts. Re-check the build after major Windows or BIOS updates.